Problem
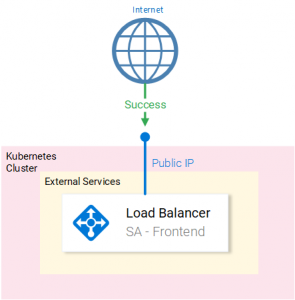
By default, the Loadbalancer Kubernetes service (in Azure) is set up as an external facing Loadbalancer with a Public IP that makes it publicly accessible, making it vulnerable to attacks or other exploits. (See Fig. 1.)
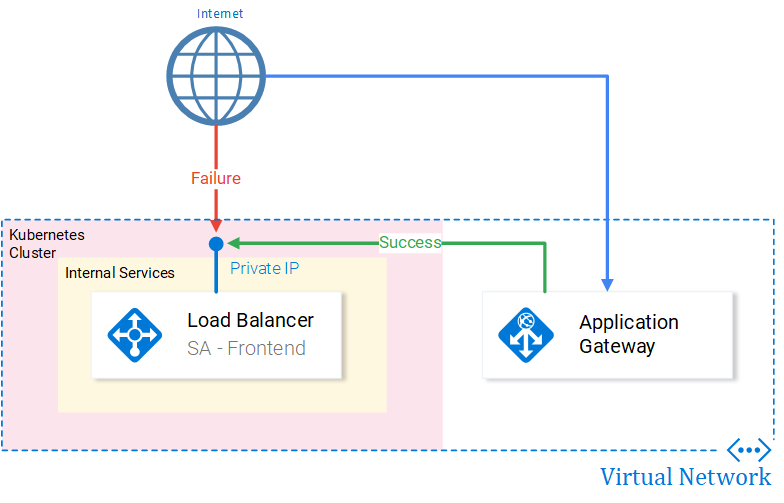
To provide our application with higher security (Web Application Firewall, SSL, etc.) we need to manage requests to the Service with additional services like for e.g. the Application Gateway service. (See Fig. 2.)
Info: Services can support SSL themselves (i.e. we can configure Nginx application server to use certificates), though doing so with the Application Gateway will offload this task from the service.
Solution
Update as of 07 July 2019: A better solution now is using the controller provided by Azure, for more information check out the following GitHub repository for Application Gateway Kubernetes Ingress.
Internal LoadBalancer Configuration
For a load balancer to be only internally accessible we need to change the Kubernetes configuration to request an internal LoadBalancer, by applying the following annotation: service.beta.kubernetes.io/azure-load-balancer-internal: "true". For the full configuration see Figure 3.
To deploy this service execute the command: kubectl create -f deployment-frontend-internal.yaml, which delegates to Kubernetes to request from Azure Resource Manager an Internal Loadbalancer, with a private IP for our service.
To get the IP we need to execute the command kubectl get svc --watch. The watch flag will keep you updated when Azure provides your service with an IP. We need this IP for forwarding requests from Application Gateway.
Configuring the Application Gateway
Get a 🍵 as this requires more steps:
- Adding a Subnet for our Application Gateway in the Virtual Network of the Kubernetes Cluster.
- Go to your Kubernetes resources and select the Virtual Network.
- Under Settings > Subnets > + Subnet
- Fill in the information as desired. (Or as shown in the Fig. 3. Careful! If you select a Network Security Group you need to allow access to GW ports.)
Fig. 4. Subnet Configuration
- Adding an Application Gateway:
- Fill all information in the first blade Basic.
- In the Settings blade (shown in Fig. 4.):
- Open Virtual Network.
- Select the Virtual Network of the Kubernetes cluster.
- Select the Subnet created in step 4.
- Complete the setup.
Fig. 5. Steps for Subnet selection
- Configuring the Application Gateway:
- Navigate to Backend Pools:
- Select existing pool appGatewayBackendPool.
- Add target [Private IP of the Service]. Save
- Navigate to HTTP Settings, which defines the incoming port of the request. We use the existing Settings, as we want the direct call (port 80) to be forwarded to the front end service.
- Navigate to Listeners and define a Listener for port 80. As a visualization HTTP Setting defines a port for an incoming call and the Listener is the connection to the rule.
- Navigate to Rules. Ensure that your rule is connecting the Listener with the Backend pool(By default the rule is set up to use the default listener and the default backend pool.)
- Navigate to Backend Pools:
Conclusion: The defaults work just fine. But remember to do the steps when adding additional backend pool, http setting, listener and the rule that ties everything together.
Info: When creating an HTTP Setting and a listener usually it takes up to 5 minutes for the configuration to kick in. (You won’t be able to select the Settings you create)
Done!
Now our service is accessible only through the Application Gateway. Typing the IP of the Application Gateway on a browser will start this process:
- The HTTP Listener (port 80 by default) gets activated:
- The rule associated with this HTTP Listener will forward the call to:
- Backend pool associated with this rule, whose Target is the internal IP of the Loadbalancer.
Now we are left with Securing our Gateway with a certificate and with a Web Application Firewall. That will be in an upcoming article. 😉
If you enjoyed the article, please share and comment below!


