
- Introduction and Application Architecture
- Setting up the React Application
- Setting up the Spring WebApplication
- Setting up the Python Application
- Container-ization of the Services
- Container-ization of everything else
- Introduction to Kubernetes
- Kubernetes in Practice – Pods
- Kubernetes in Practice – Services
- Kubernetes in Practice – Deployments
- Kubernetes and everything else in Practice
- Kubernetes Volumes – in Practice
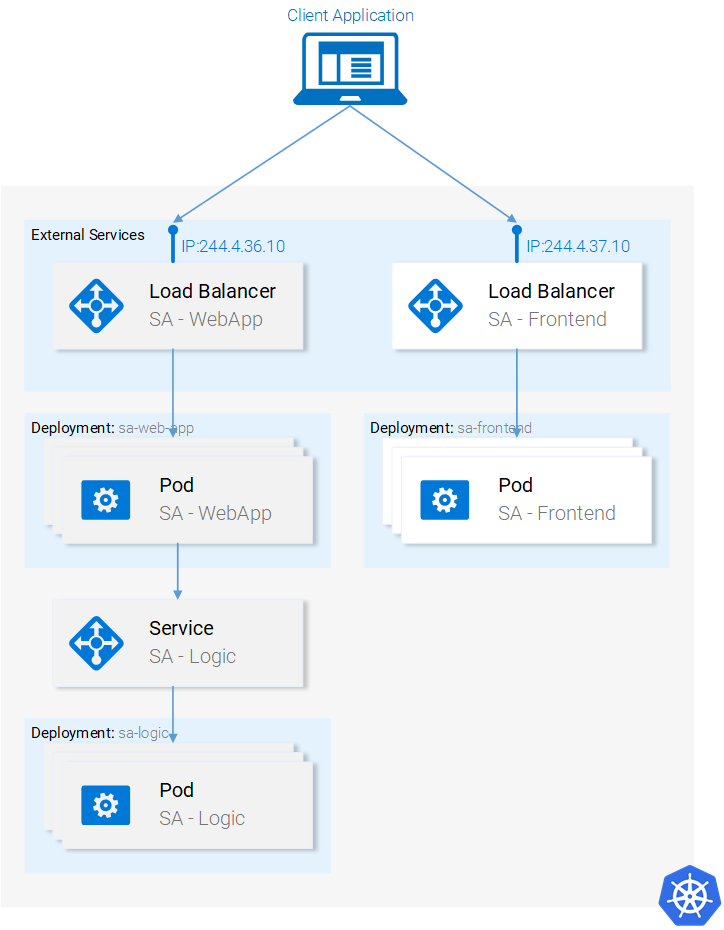
In the last three articles (Kubernetes in Practice – Pods, Services, and Deployments) we put many Kubernetes concepts into practice, but there is still more work to do, for reference see figure 1. Up to now we completed the LoadBalancer for the frontend and deployed the SA-Frontend pods. There is still a good chunk left to do, but because we know all the basics, completing those will be quick.
Deployment SA Logic
Navigate with your terminal to the folder resource-manifests and execute the following command:
$ kubectl apply -f sa-logic-deployment.yaml --record
deployment "sa-logic" created

The deployment SA-Logic created three pods (running the container of our python application) and it labeled them with app: sa-logic, this labeling enables us to target them using a selector from the SA-Logic service, but before we do that, let’s open the file sa-logic-deployment.yaml and check out the contents.
Do you notice that it’s the same concepts used all over again? This is why we will continue without further due to the next resource the service SA-Logic.
Service SA Logic
Before we get started let’s elaborate why we need this Service. The reason why we need the SA-Logic service is that our Java application (running in SA – WebApp) depends on the sentiment analysis done by the Python Application. But now, in contrast when we were running everything locally, we don’t have 1 python application listening to one port, we have 3 pods and if needed we could have countless pods running and listening for requests. And as we said in the article about services “The Kubernetes Service resource acts as the entry point to a set of pods that provide the same functional service”, this means that we can use the Service SA-Logic as the entry point to all the SA-Logic pods.

Let’s do that:
$ kubectl apply -f service-sa-logic.yaml --record
service "sa-logic" created
Current Application State: We have 3 pods (containing the Python Application) running and we have the SA-Logic service as an entry point that we will use in the SA-WebApp pods. Now we need to deploy the SA-WebApp pods, using a deployment.
Deployment SA WebApp
We are getting the hang out of deployments, though this one has one more feature. If you open the file sa-web-app-deployment.yaml you will find this part new:
- image: rinormaloku/sentiment-analysis-web-app
  imagePullPolicy: Always
  name: sa-web-app
  env:
    - name: SA_LOGIC_API_URL
      value: "http://sa-logic"
  ports:
    - containerPort: 8080
The first thing that interests us is what does the env property do? And we surmise that it is declaring the environment variable SA_LOGIC_API_URL with the value “http://sa-logic” inside our pods. And that’s exactly what’s happening.
If you remember, our Spring WebApp was forwarding calls to the Python Application, and for that, we were providing the IP and PORT of the python application as a property to the Spring WebApp (and later on we were providing the value of the property as a container Environment variable using SA_LOGIC_API_URL). But why are we initializing it to http://sa-logic, what is sa-logic?
We cannot postpone this any longer, let’s get introduced to kube-dns.
KUBE-DNS
Kubernetes has a special pod the kube-dns. And by default, all Pods use it as the DNS Server. One important property of kube-dns is that it creates a DNS record for each created service. This means that when we created the service sa-logic it got an IP address and its name was added as a record (in conjunction with the IP) in kube-dns, this enables all the pods to translate the sa-logic to the SA-Logic services IP address.
Good, now we can continue with:
Deployment SA WebApp (continued)
Execute the familiar command:
$ kubectl apply -f sa-web-app-deployment.yaml --record
deployment "sa-web-app" created
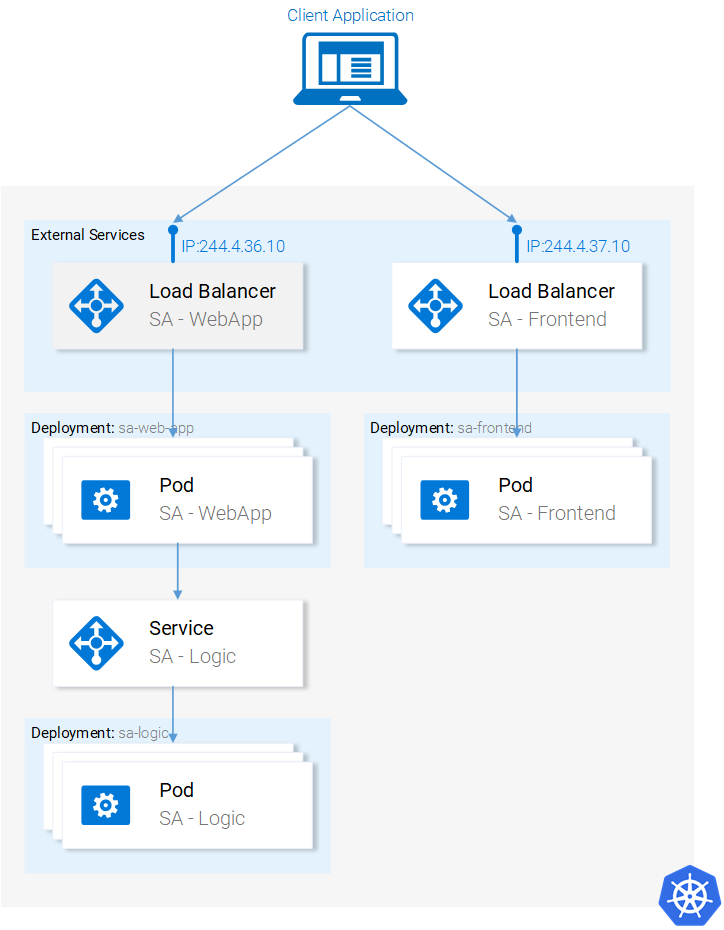
Done. See figure 2 for the progress, we are left to expose the SA-WebApp pods externally using a LoadBalancer Service, this enables our react application to make http requests to the service as an entry point to the SA-WebApp pods.
Service SA WebApp
Open the file service-sa-web-app-lb.yaml, as you can see it’s composed of stuff that you have mastered.
So without further due execute the command:
$ kubectl apply -f sa-web-app-deployment.yaml
deployment "sa-web-app" created
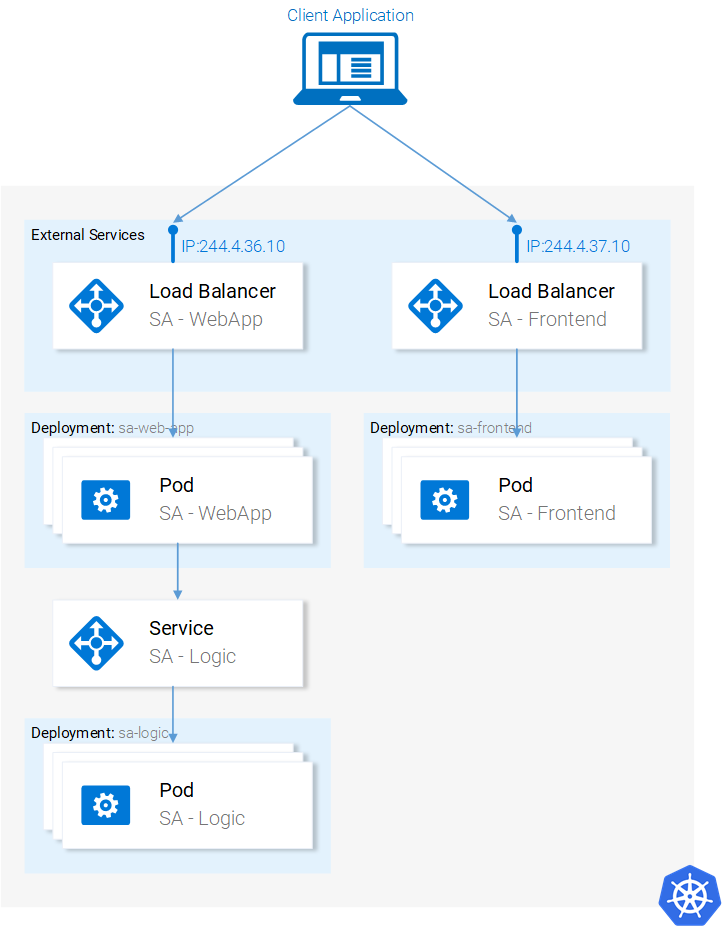
The architecture is complete. But we have one single dissonance. When we deployed the SA-Frontend pods our container image was pointing to our SA-WebApp in http://localhost:8080/sentiment, but now we need to update it to point to the IP of the SA-WebApp Loadbalancer (which acts as an entry point to the SA-WebApp pods).
To fix this dissonance provides us with the opportunity to succinctly encompass once more everything from code to deployment (it’s even more effective if you do this alone instead of following the guide below). Let’s get started:
- Get the SA-WebApp Loadbalancer IP by executing the following command:
$ minikube service list
|-------------|----------------------|-----------------------------|
|  NAMESPACE  |         NAME         |             URL             |
|-------------|----------------------|-----------------------------|
| default     | kubernetes           | No node port                |
| default     | sa-frontend-lb       | http://192.168.99.100:30708 |
| default     | sa-logic             | No node port                |
| default     | sa-web-app-lb        | http://192.168.99.100:31691 |
| kube-system | kube-dns             | No node port                |
| kube-system | kubernetes-dashboard | http://192.168.99.100:30000 |
|-------------|----------------------|-----------------------------|
- Use the SA-WebApp LoadBalancer IP in the file
sa-frontend/src/App.js, as shown below:
    analyzeSentence() {
        fetch('http://192.168.99.100:31691/sentiment', { /* shortened for brevity */})
            .then(response => response.json())
            .then(data => this.setState(data));
    }
- Build the static files
$ yarn build(you need to navigate to the folder sa-frontend) - Build the container image:
$ docker build -f Dockerfile -t $DOCKER_USER_ID/sentiment-analysis-frontend:minikube .
- Push the image to Docker hub.
$ docker push $DOCKER_USER_ID/sentiment-analysis-frontend:minikube
- Edit the
sa-frontend-deployment.yamlto use the new image and - Execute the command
kubectl apply -f sa-frontend-deployment.yaml
Refresh the browser or if you closed the window execute minikube service sa-frontend-lb. Give it a try by typing a sentence!
Summarization
You actually made it here! Now just to recapitulate everything we covered:
- Building / Packaging / Running ReactJS, Java and Python Applications
- Docker Containers; how to define and build them using Dockerfiles,
- Container Registries; we used the Docker Hub as a repository for our containers.
- We covered the most important parts of Kubernetes.
- Pods
- Services
- Deployments
- New concepts like Zero-Downtime deployments
- Creating scalable apps
- And in the process, we migrated the whole microservice application to a Kubernetes Cluster.
This series provided you with the firm basis, that will enable you to tackle any project and learn new additional concepts along the way.
I am hoping that this series “Kubernetes and everything else” was beneficial for you and am sure that it will help you in your career, if it did please let me know and if you have any critiques please write them to me as well.
For your information, I will continue doing new amazing series like this one every 3 months. If you are interested, please subscribe to my newsletter and don’t forget to verify your email, otherwise, you might miss them!
If you enjoyed the article, please share and comment below!