
- Introduction and Application Architecture
- Setting up the React Application
- Setting up the Spring WebApplication
- Setting up the Python Application
- Container-ization of the Services
- Container-ization of everything else
- Introduction to Kubernetes
- Kubernetes in Practice – Pods
- Kubernetes in Practice – Services
- Kubernetes in Practice – Deployments
- Kubernetes and everything else in Practice
- Kubernetes Volumes – in Practice
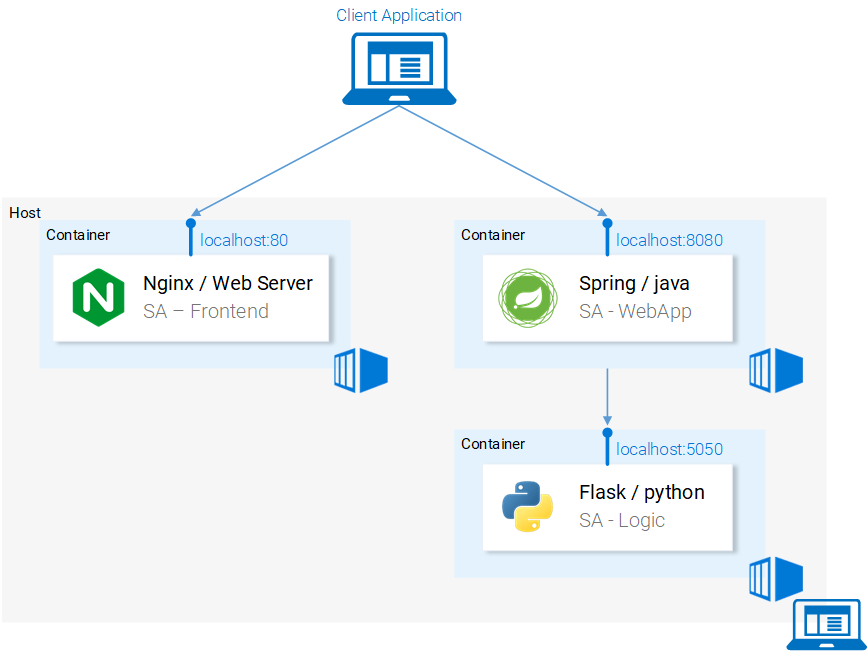
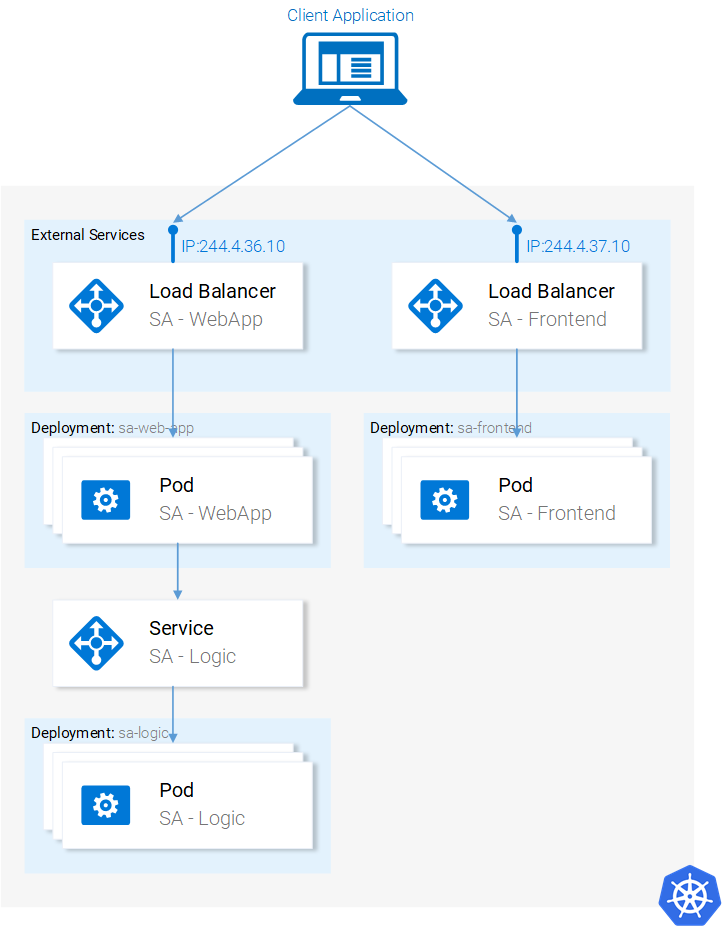
We covered how to run the Microservices in separate containers in these two articles Container-ization of the Services and Container-ization of everything else, and it was a cumbersome process, but it worked (see fig. 1.). Additionally, we mentioned that this solution is not scalable or resilient and that Kubernetes will resolve these issues. So in this article and upcoming ones, we will start migrating our services toward the end result as shown in figure 2.
The initial implementation will be done locally using Minikube for rapid feedback, and in upcoming articles, we will deploy the same architecture to Azure Cloud and GCP.
Installing and Starting Minikube
Follow official documentation for installing Minikube.
During Minikube installation, you will also install Kubectl, which is a client to make requests to the Kubernetes API Server.
To start Minikube execute the command minikube start and after it is completed, execute kubectl get nodes and you should get the following output
$ kubectl get nodes
NAME       STATUS    ROLES     AGE       VERSION
minikube   Ready     <none>    11m       v1.9.0
Minikube provides us with a Kubernetes Cluster that has only one node, but remember we do not care how many Nodes there are, Kubernetes abstracts that away, and for us to learn Kubernetes that is of no importance. In the next section, we will start with our first Kubernetes resource [DRUM ROLLS] the Pod.
Pods
I love containers, and by now you love containers too, so why did Kubernetes decide to give us Pods as the smallest deployable compute unit, and what does a pod do? Pods can be composed of one or even a group of containers that share the same execution environment.
But do we really need to run two containers in one pod? Erm.. Usually, you run only one container and that’s what we will do in our examples, but for cases when for e.g. two containers need to share volumes, or they communicate with each other using inter-process communication or are otherwise tightly coupled, then that’s made possible using Pods, another feature that Pods make possible is that we are not tied to Docker containers, if desired we can use other technologies for e.g. Rkt.
To summarize, the main properties of Pods are shown in figure 3:

- Each pod has a unique IP address in the Kubernetes cluster
- Containers in a pod share the same port space, as such they can communicate via localhost (understandably they cannot use the same port), communication of containers in different pods has to be done in conjunction with the pod ip.
- Containers in a pod share the same volume*, same ip, port space, IPC namespace.
*Containers have their own isolated filesystems, though they are able to share data using the Kubernetes resource Volumes.
This is more than enough information for us to continue, but to satisfy your curiosity check out the official documentation.
Pod definition
Below we have the manifest file for our first pod sa-frontend, and then below we explain all the points.
- Kind: specifies the kind of the Kubernetes Resource that we want to create. In our case, a Pod.
- Name: defines the name for the resource. We named it sa-frontend.
- Spec is the object that defines the desired state for the resource. The most important property of a Pods Spec is the Array of containers.
- Image is the container image we want to start in this pod.
- Name is the unique name for a container in a pod.
- Container Port:is the port at which the container is listening. This is just an indicator for the reader (dropping the port doesn’t restrict access).
Creating the SA Frontend pod
You can find the file for the above pod definition in resource-manifests/sa-frontend-pod.yaml, you either navigate in your Terminal to that folder or you would have to provide the full location in the command line, then execute the command:
$ kubectl create pod -f sa-frontned-pod.yaml
pod "sa-frontend" created
To check if the Pod is running execute the following command:
$ kubectl get pods
NAME                          READY     STATUS    RESTARTS   AGE
sa-frontend                   1/1       Running   0          7s
If it is still in ContainerCreating you can execute the above command with the argument --watch to update the information when the Pod is in Running State.
Get a Shell into the Running container
We can get a shell into the running container and check if the pod has the data of our container, this would ensure us that everything worked perfectly. You can do so by executing the following commands:
$ kubectl exec -it sa-frontend -- /bin/bash
root@sa-frontend:/# ls /usr/share/nginx/html/
50x.html  asset-manifest.json  favicon.ico  index.html  manifest.json  service-worker.js  static
root@sa-frontend:/# exit
exit
Accessing the application externally
To access the application externally we create a Kubernetes resource of type Service, that will be our next article, which is the proper implementation, but for quick debugging we have another option, and that is port-forwarding:
$ kubectl port-forward sa-frontend-pod 88:80
Forwarding from 127.0.0.1:88 -> 80
Open your browser in 127.0.0.1:88 and you will get to the react application.
The wrong way to scale up
We said that one of the Kubernetes main features was that it provides scalability, to prove this let’s get another pod running. To do so create another pod resource, with the following definition:
Create the new pod by executing the following command:
$ kubectl create pod -f sa-frontned-pod2.yaml
pod "sa-frontend2" created
Verify that the second pod is running by executing:
$ kubectl get pods
NAME                          READY     STATUS    RESTARTS   AGE
sa-frontend                   1/1       Running   0          7s
sa-frontend2                  1/1       Running   0          7s
Now we have two pods running!
Attention: this is not the final solution, and it has many flaws, that we will improve in the section for another Kubernetes resource Deployments, and Deployments are the most amazing part. 😎
Summarization
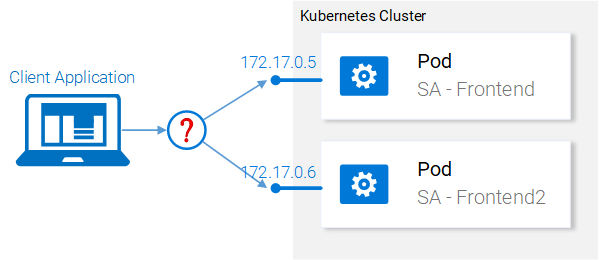
The Nginx web server with the static files is running inside two different pods, but now we have two questions:
- How do we expose it externally to make it accessible via URL, and
- How do we load balance between them?
Kubernetes provides us the Services resource. Let’s jump right into it, in the next section.
If you enjoyed the article, please share and comment below!