
- Introduction and Application Architecture
- Setting up the React Application
- Setting up the Spring WebApplication
- Setting up the Python Application
- Container-ization of the Services
- Container-ization of everything else
- Introduction to Kubernetes
- Kubernetes in Practice – Pods
- Kubernetes in Practice – Services
- Kubernetes in Practice – Deployments
- Kubernetes and everything else in Practice
- Kubernetes Volumes – in Practice
Kubernetes Deployments help us with one constant in the life of every application, and that is change. Moreover, the only applications that do not change are the ones that are already dead, and while not, new requirements will come in, more code will be shipped, it will be packaged, and deployed. And on each step of this process, mistakes can be made.
The Deployment resource automates the process of moving from one version of the application to the next, with zero downtime and in case of failures, it enables us to quickly rollback to the previous version.
Deployments in Practice
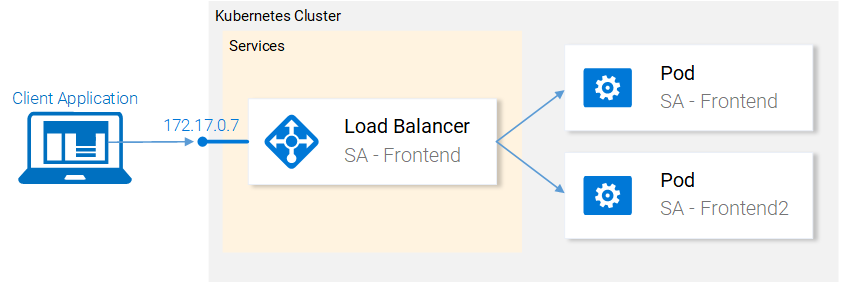
We left our application with two pods and a service exposing them and load balancing between them (see Fig. 1.). We mentioned that deploying the pods separately is far from perfect, as it requires separately managing each (create, update, delete and monitoring their health). Quick updates and fast rollbacks are out of the question. This can be improved using the Kubernetes resource Deployments.
Before we continue let’s state what we want to achieve, as it will provide us with the needed overview to understand the manifest definition for the deployment.
What we want is:
- Two pods of the image
rinormaloku/sentiment-analysis-frontend - Zero Downtime deployments,
- Pods labeled with
app: sa-frontendso that the services get discovered by the Service sa-frontend-lb.
Let’s see how we translate it into a Deployment definition.
Deployment definition
Let’s throw ourselves in the YAML definition and as always the explanation for all the points is right below it.
- Kind: A deployment.
- Replicas is a property of the deployments Spec object that defines how many pods we want to run. So only 2.
- Type specifies the strategy used in this deployment when moving from the current version to the next. The strategy RollingUpdate ensures Zero Downtime deployments.
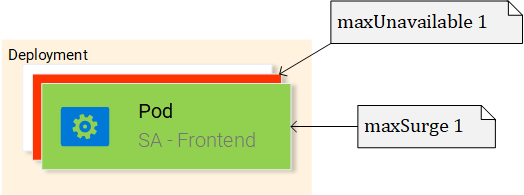
- MaxUnavailable is a property of the RollingUpdate object that specifies the maximum unavailable pods allowed (compared to the desired state) when doing a rolling update. For our deployment which has 2 replicas this means that after terminating one Pod, we would still have one pod running, this way keeping our application accessible.
- MaxSurge is another property of the RollingUpdate object that defines the maximum amount of pods added to a deployment (compared to the desired state). For our deployment, this means that when moving to a new version we can add one pod, which adds up to 3 pods at the same time.
- Template: specifies the pod template that the Deployment will use to create new pods. Most likely the resemblance with Pods struck you immediately.
app: sa-frontendthe label to use for the pods created by this template.- ImagePullPolicy when set to Always, it will pull the container images on each redeployment.
Honestly, that wall of text got even me confused, let’s just get started with the example:
$ kubectl apply -f sa-frontend-deployment.yaml
deployment "sa-frontend" created
As always let’s verify that everything went as planned:
$ kubectl get pods
NAME                           READY     STATUS    RESTARTS   AGE
sa-frontend                    1/1       Running   0          2d
sa-frontend-5d5987746c-ml6m4   1/1       Running   0          1m
sa-frontend-5d5987746c-mzsgg   1/1       Running   0          1m
sa-frontend2                   1/1       Running   0          2d
Hooray, 🎉🎉🎉 wait what… four pods? Oh… remember, these are the two pods we created manually, while we still were newbies 😳. Delete them using the command kubectl delete pod <pod-name>, before somebody notices.
FYI: We didn’t necessarily have to delete the two pods. We could have taken them under the wing of our deployment using matchLabels.
You might want to ask “So what was so cool about Deployments, you were making a big deal out of it Rinor?”. Yeah, because it’s a big deal, my friend! Let me get started with the benefits.
Benefit #1: Rolling a Zero-Downtime update
Our Product manager came to us with a new silly requirement, our clients want to have a green button in the frontend. The developers shipped their code and provided us with the only thing we need, the container image rinormaloku/sentiment-analysis-frontend:green. Now it’s our turn, we the DevOps have to roll a Zero-Downtime update, Will the hard work pay off? Let’s see that!
Edit the file deploy-frontend-pods.yaml by changing the container image to refer to the new image: rinormaloku/sentiment-analysis-frontend:green. Save the changes and execute the following command:
$ kubectl apply -f deploy-frontend-green-pods.yaml --record
deployment "sa-frontend" configured
We can check the status of the rollout using the following command:
$ kubectl rollout status deployment sa-frontend
Waiting for rollout to finish: 1 old replicas are pending termination...
Waiting for rollout to finish: 1 old replicas are pending termination...
Waiting for rollout to finish: 1 old replicas are pending termination...
Waiting for rollout to finish: 1 old replicas are pending termination...
Waiting for rollout to finish: 1 old replicas are pending termination...
Waiting for rollout to finish: 1 of 2 updated replicas are available...
deployment "sa-frontend" successfully rolled out
According to the output the deployment was rolled out. We gotta verify that!
Verifying the deployment

We can trust Kubernetes, but we always trust our eyes more, so let’s see the update live on our browsers. Execute the same command that we used before minikube service sa-frontend-lb, which opens up the browser and hey! See there! The silly green button.
This was so cool wasn’t it and you are hyped to know the trick that deployments use, let’s see it!
Behind the scenes of “The RollingUpdate”
Like all tricks when revealed, they are always simple, and the RollingUpdate trick is no different, so let’s elaborate what happened behind the scenes:
When we apply a new deployment, Kubernetes will compare the new state with the old one, and in our case, the new state requests two pods with the image rinormaloku/sentiment-analysis-frontend:green, this is different from the current state running so it kicks in the RollingUpdate.
The RollingUpdate acts according to the rules we specified, those being “maxUnavailable: 1″ and “maxSurge: 1″, this means that the deployment can terminate only one pod, and can start only one new pod, this process is repeated until all pods are replaced.
Let’s get started with the benefit number 2.
Disclaimer: For my entertainment (and probably yours as well), I am writing the next part as a novella.
Benefit #2: Rolling back to a previous state
The Product Manager runs into your office and he is having a crisis!
“The application has a critical bug, in PRODUCTION!! Revert back to the previous version immediately” – yells the product manager.
He sees the coolness in you, not twitching one eye. You turn to your beloved terminal and type:
$ kubectl rollout history deployment sa-frontend
deployments "sa-frontend"
REVISION  CHANGE-CAUSE
1         <none>
2         kubectl.exe apply --filename=sa-frontend-deployment-green.yaml --record=true
You take a short look at the previous deployments. “The last version is buggy, meanwhile the previous version worked perfectly?” – you ask the Product Manager.
“Yes, are you even listening to me!” – screams the product manager.
You ignore him, you know what you have to do, you start typing:
$ kubectl rollout undo deployment sa-frontend --to-revision=1
deployment "sa-frontend" rolled back
You refresh the page and the change is undone!
The product managers jaw drops open.
You saved the day!
The end!
Yeah, I know… it was boring novella, before Kubernetes existed it was soo much better, we had more drama, higher intensity, and that for a longer period of time. Ohh good old times!
Most of the commands are self-explanatory, besides one detail that you had to work out urself and that is the reason why the first revisions CHANGE-CAUSE is <none> meanwhile the second revisions CHANGE-CAUSE is “kubectl.exe apply –filename=sa-frontend-deployment-green.yaml –record=true“. If you concluded that it’s because of the --record flag that we used when we applied the new image then you are totally correct!
Summarization
We put Deployments into practice by creating a deployment, doing a rolling update to the new version and then due to a bug, we rolled back to the previous version. We also learned what happens behind the scenes and there is even more to Deployments, like maintaining the desired state and automatic rollbacks using health checks, to name just a few. These topics will be covered in upcoming articles.
In the next article will use the concepts learned in the articles “Kubernetes in Practice” to complete the whole architecture.
If you enjoyed the article, please share and comment below!