

- Introduction and Application Architecture
- Setting up the React Application
- Setting up the Spring WebApplication
- Setting up the Python Application
- Container-ization of the Services
- Container-ization of everything else
- Introduction to Kubernetes
- Kubernetes in Practice – Pods
- Kubernetes in Practice – Services
- Kubernetes in Practice – Deployments
- Kubernetes and everything else in Practice
- Kubernetes Volumes – in Practice

Up to now none of our services had a real need for persistent storage. So to showcase Kubernetes Volumes, we will introduce another service the SA-Feedback. This service enables users to provide feedback if the Sentiment Analysis was correct or not. This requires accommodations in the frontend and the changes can be seen in Fig. 1.
SA Feedback overview
We estimated that SA-Feedback won’t have a huge load as it’s not a prominent feature, for this reason, we go with a simplistic solution:
- ASP.NET Core web app with two endpoints:
- POST-ing a feedback
- GET-ing feedbacks
- SQLite 3 Relational File-Based Database (not scalable).
To run this application locally see instructions in the README of the sa-feedback service.
In the continuation of this article, the code samples are from the volumes branch of this repo.
Kubernetes Volumes
The SA-Feedback service will be deployed using the Deployments API and it is just another Pod template with additional properties for an external volume to be mounted in the container:
- volumes – an array of volumes that the pod requires.
- volumeMounts – a container selecting one member from the volumes array and mounting it to the application.
Sounds easy, doesn’t it? It’s even simpler in action:
- claimName: specifies which Persistent Volume Claim the application needs.
- name: of the volume claimed, one pod could use multiple volumes we select the volume by name.
- volumeMounts: specifies the list of volumes this container requires selecting it by name (3.a) and mounting to the specified path of the container (3.b)
Apply the deployment by executing the command below:
$ kubectl apply -f ./resource-manifests/sa-feedback/sa-feedback-service.yaml
deployment.extensions "sa-feedback" created
service "sa-feedback" created
ingress.extensions "sa-ingress-feedback" created
The service and the ingress rule were defined in the file as well, making the app ready to handle requests.
Using kubectl describe we find the message “persistentvolumeclaim “sqlite-pvc” not found” and that’s the topic of the next section!
Claiming persistent volume for SA-Feedback
We claim the persistent volume with the PersistentVolumeClaim resource definition below:
- name of the persistent volume that we will request in the pod (in our case already requested).
- accessModes: ReadWriteOnce specifies that the volume can be read and written to only by one consumer.
- storage: We request 1Gi of storage.
Create the persistent volume claim by executing the command below:
$ kubectl apply -f ./resource-manifests/sa-feedback/sa-feedback-pvc.yaml
persistentvolumeclaim "sqlite-pvc" created
Verify that the Persistent Volume was created by the Provisioner.
$ kubectl get pv
NAME                CAPACITY    STATUS    CLAIM                STORAGECLASS
pvc-475151fb-[...]  1Gi         Bound     default/sqlite-pvc   hostpath
Verify that the pod is in running status:
$ kubectl get pods
NAME                           READY     STATUS    RESTARTS   AGE
sa-feedback-85f96cc585-ccj5b   1/1       Running   0          12m
It’s working! (Note: For this to work, we depend on a default Storage Class, and there is the off chance that the Kubernetes implementation you use doesn’t have one. More on this later)
Double checking
Just because every developer is paranoid and cannot trust anything that is so simple we need to double check.
- Access the UI on the base root of the EXTERNAL-IP of the ingress controller:
$ kubectl get svc -l component=controller --all-namespaces
- Create a feedback.
- Verify that the feedback is saved by execute the following command:
$ curl http://{{EXTERNAL-IP}}/feedback
[{"id":1,"sentence":"I love yogobella","polarity":0.5,"correct":true}]- Delete the pod
$ kubectl delete pods -l app=sa-feedback>
pod "sa-feedback-85f96cc585-nj55b" deleted
- After the pod is recreated repeat the third step and verify the same output.
Hurray! We verified that the data is persisted, and we tested that upon pod restarts the data is still there!
As a developer, this is all you need to know, but there is a huge opportunity to learn what happens behind the scenes, and this knowledge will be of paramount importance every time you have to deal with volumes. If you are interested in knowing more let’s just jump into it.
Kubernetes Volumes – Key Concepts
- The Persistent Volume Claim, as the name suggests, it’s a claim for a persistent volume needed by our application to get its job done. And we need this abstraction because as developers we don’t need the infrastructure details on how this volume is created and secondly, we are decoupling how the persistent volume is provided to us. In other words, the same claim will work in different cloud providers, though administrators might need to make changes in the Storage Classes (more on that later).
- The Persistent Volume captures the infrastructure details like capacity, access modes, volume reclaim policy (what happens after a claim is deleted) etc. This is what Administrators (or Operators) need to provide.
In Fig. 2. we can see these two resources and how they fit in relation with the sa-feedback service.
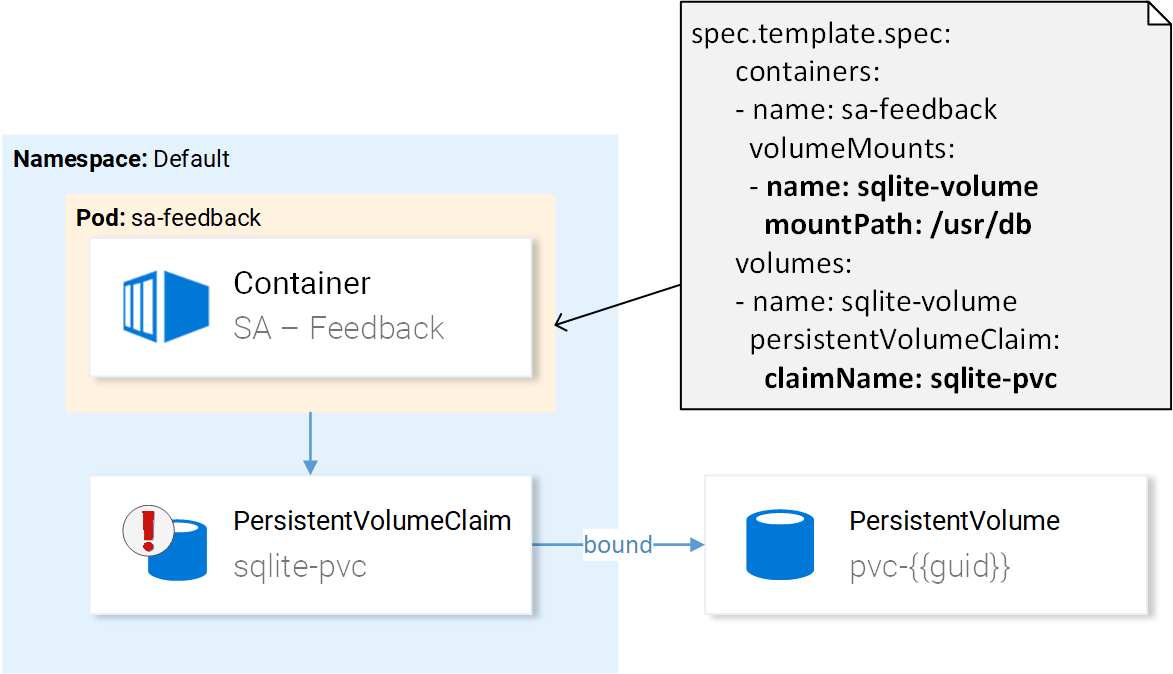
Summary: The pod requests a persistent volume claim and mounts it to the container, and Kubernetes creates the Persistent Volume where the files of the mounted path will reside.
The question arises what created the persistent volume?
Kubernetes Volumes – Storage Class
Kubernetes simplifies the provisioning of Persistent Volumes using Persistent Volume Provisioners, for the main cloud service providers the provisioners are already built in.
To make use of the Provisioners a cloud administrator needs to create Storage Classes that specify:
- Properties for the Persistent Volumes created by this Storage Class (e.g. different storage type, reclaim policy, geo-replication etc.)
- Provisioner to use for creating the Persistent Volumes.
In Fig. 3. we can see the updated diagram with Storage Class and the Provisioner.
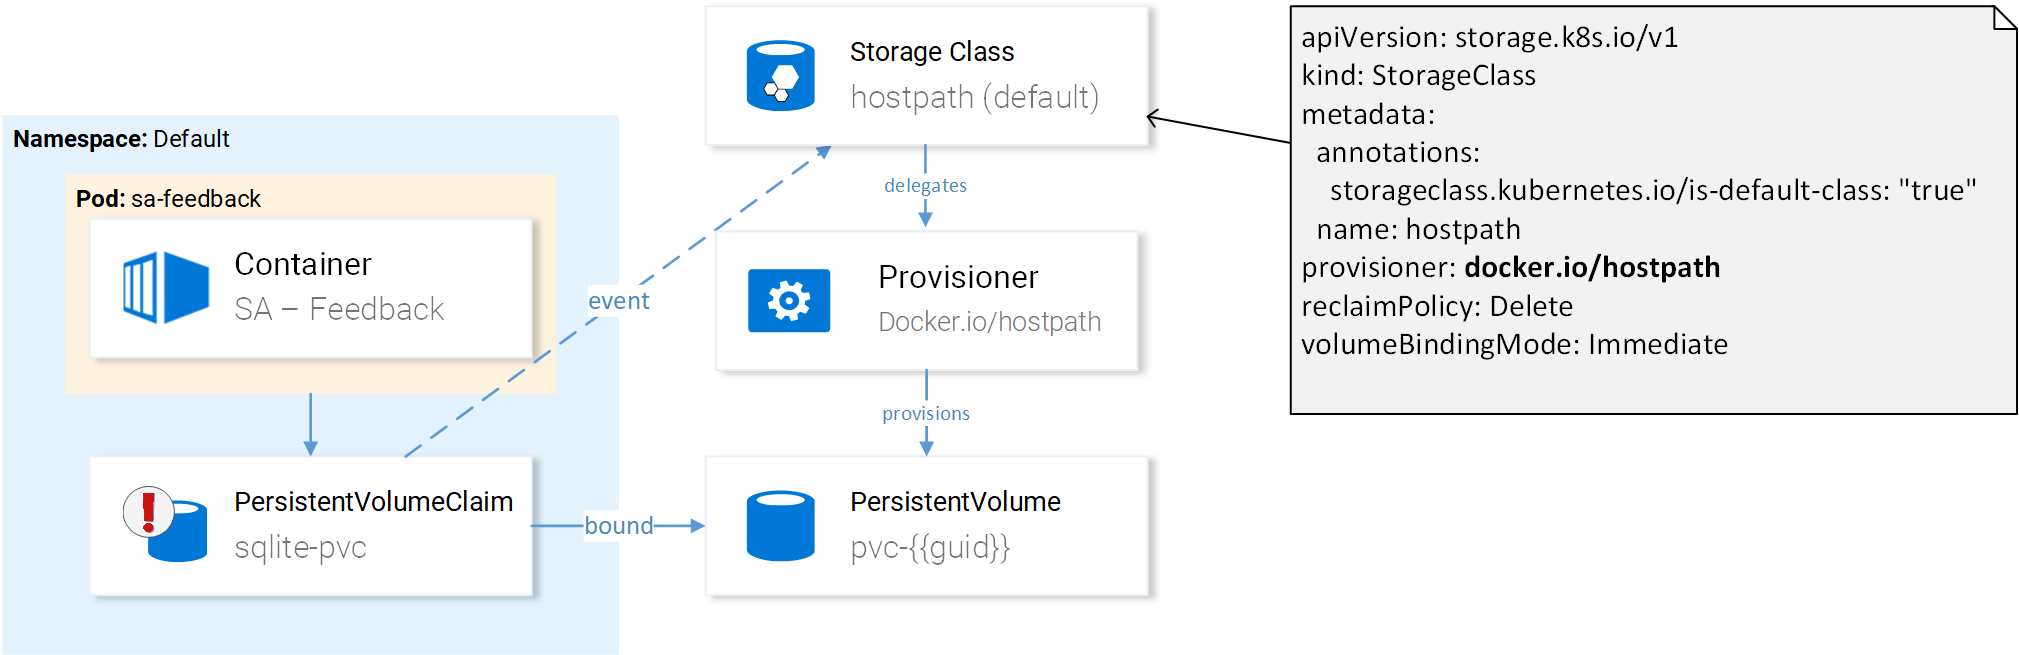
The extended process:
- The event of creating a PersistentVolumeClaim was caught by the default storage class which delegates the process of creating the persistent volume to the specified provisioner.
- The provisioner creates the volume
- As soon as the volume is created it gets claimed by the persistent volume claim.
Before we complete this article let’s verify that our Kubernetes Cluster has a Storage Class and a PersistentVolume, by executing the commands below:
$ kubectl get sc
NAME                 PROVISIONER          AGE
hostpath (default)   docker.io/hostpath   82d
$ kubectl get pv
NAME           RECLAIM POLICY    CLAIM                STORAGECLASS
pvc-{{guid}}   Delete            default/sqlite-pvc   hostpath
Note: Kubernetes includes the provisioners.
Summary
We came a long way and really take some time to appreciate this investment. We learned how to provide state to our applications, and how to achieve that using persistent volume claims and how Kubernetes uses Storage Classes and Provisioners to create the Persistent Volume.
This is a good foundation but it’s still just a part of what Kubernetes Volumes has to offer and for this reason, I recommend to check out the official documentation and just skim over the whole of it, gather just enough information of the big picture when other parts might be a better fit.
If you enjoyed the article, please share and comment below!