
- Istio an introduction
- Getting started with Istio
- Istio in Practice – Ingress Gateway
- Istio in Practice – Routing with VirtualService
- Istio out of the box: Kiali, Grafana & Jaeger
- A/B Testing – DestinationRules in Practice
- Shadowing – VirtualServices in Practice
- Canary Deployments with Istio
- Timeouts, Retries and CircuitBreakers with Istio
- Authentication in Istio
- Authorization in Istio
- Istio series Summary
Authorization with Auth0
Authentication enables us to know who a user is, but we need the authorization to know what they can access. Istio provides the tools for this as well!
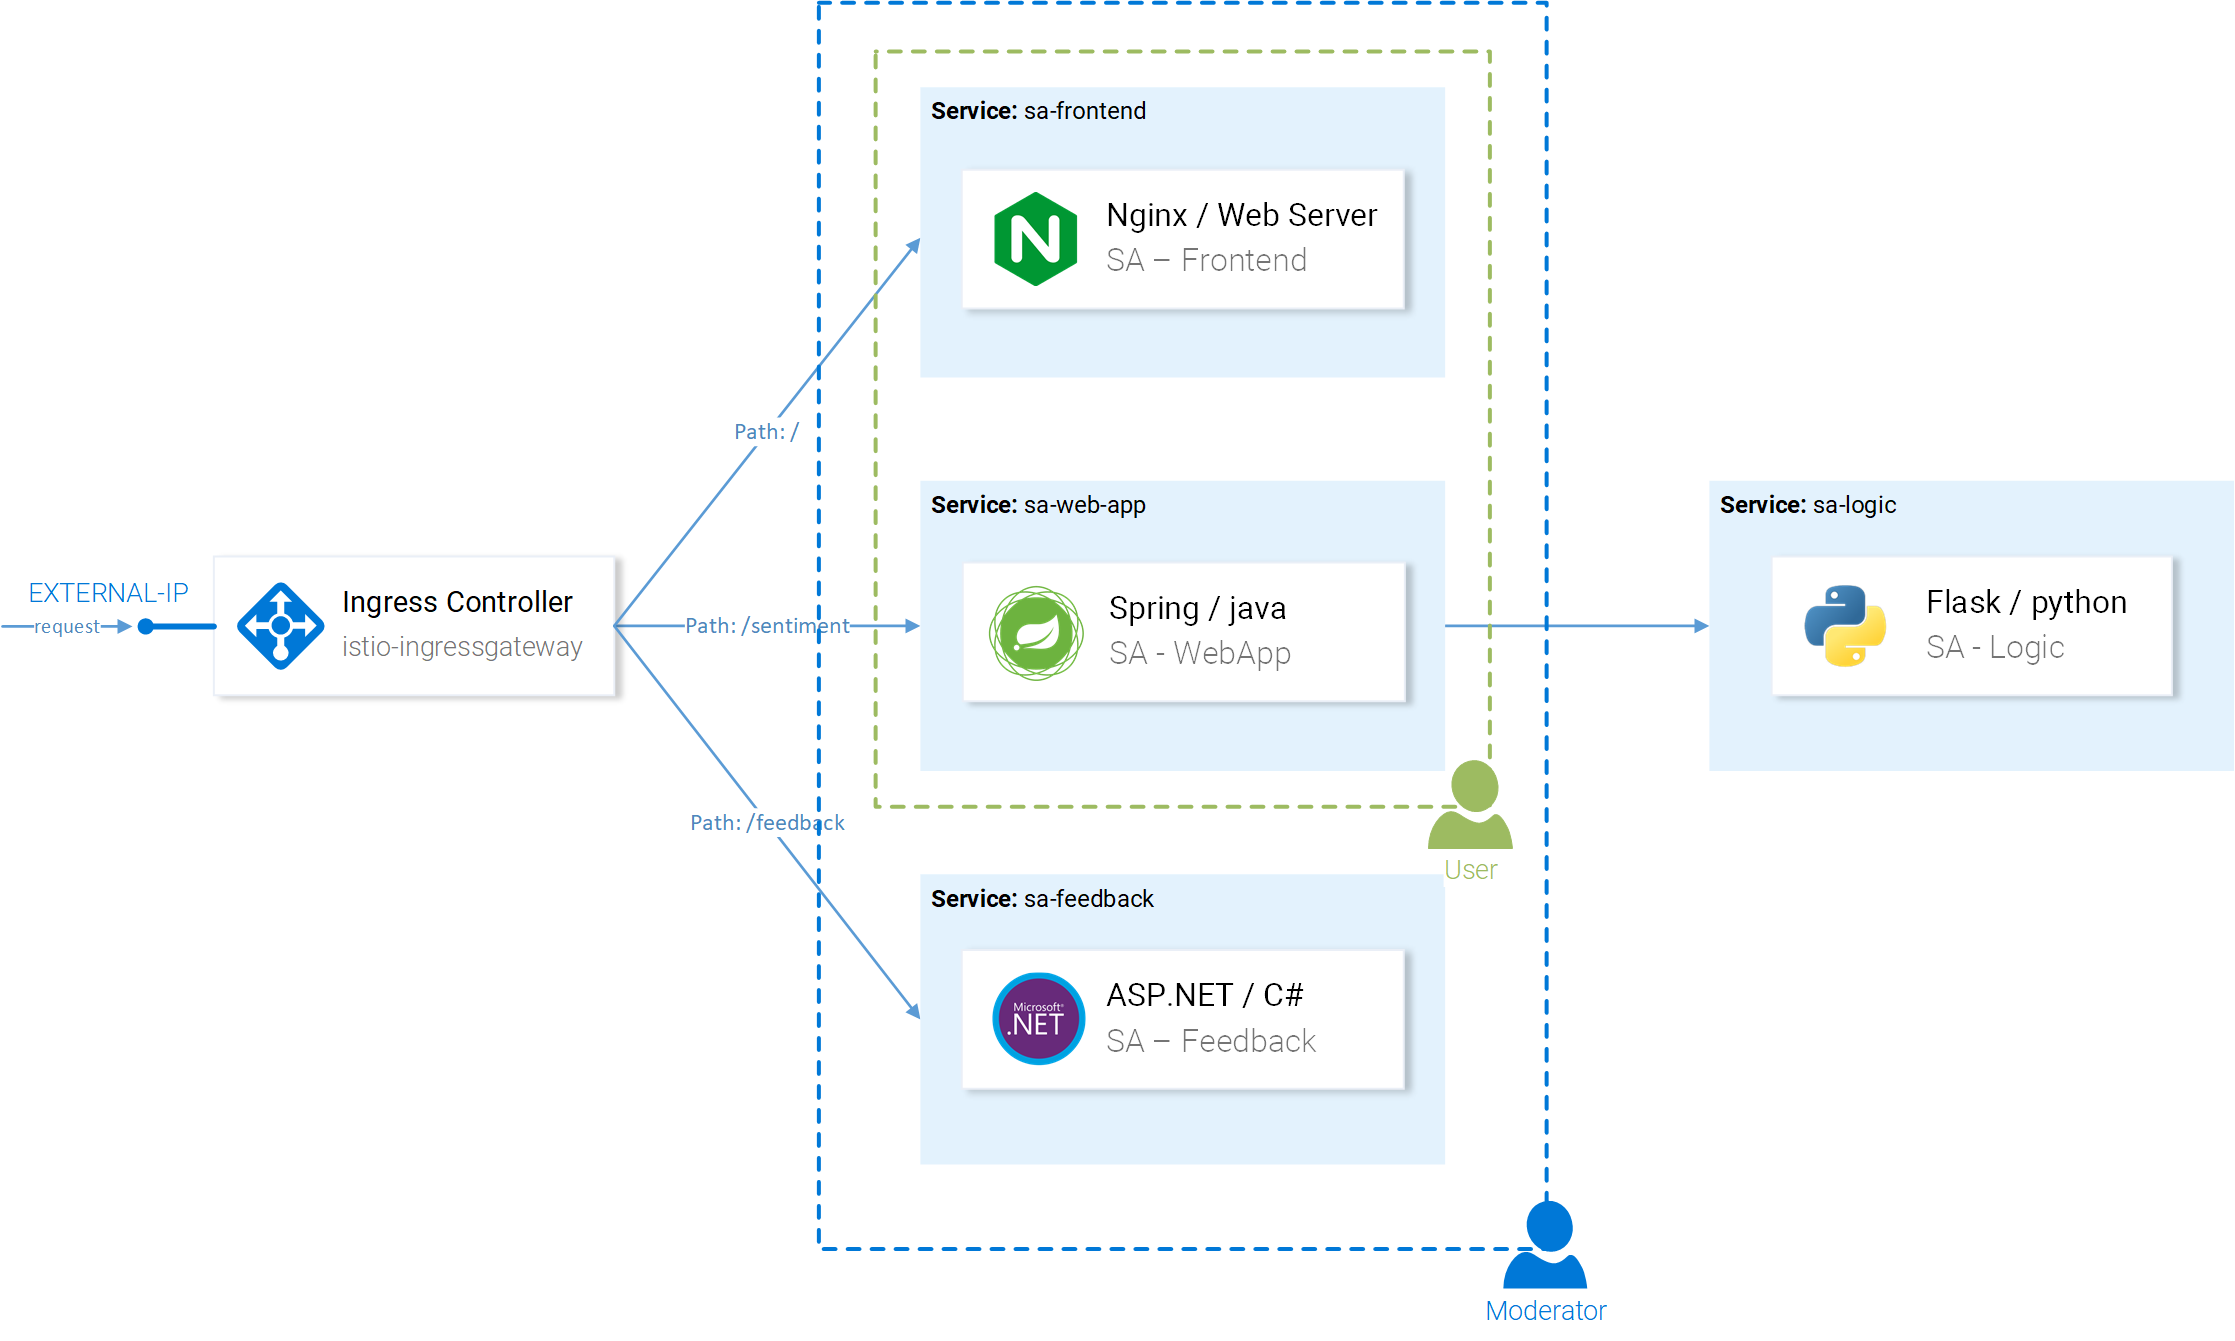
As an example, we’ll create two groups of users (shown in figure 24):
- Users: with access to only the SA-WebApp and SA-Frontend service.
- Moderators: who can access all three services.
To create the user groups, we will use the Auth0 Authorization extension, and then using Istio we will provide them with different levels of access.
Install and Configure Auth0 Authorization
In the Auth0 portal navigate to Extensions and install the ‘Auth0 Authorization’ extension. After the installation, navigate to the Authorization Extension and configure by clicking your tenant in the top right corner and selecting the menu option “Configuration”. Enable Groups and click the button Publish rule.
Create Groups
In the Authorization Extension navigate to Groups and create the Moderators group. Meanwhile, we will treat all Authenticated Users as Regular Users and as such, there is no need to create an additional group.
Select the Moderators group and click Add Members, add your main account. Leave some users without any Group to verify that for them access is forbidden. (You can register new Users manually in Auth0 Portal > Users > Create User)

Add Group Claim to the Access Token
Users are added to the groups, but this information won’t be reflected to the access token. To stay OpenID Connect conformant and at the same time to return the groups we need to add custom namespaced claims to the token. This can be done using Auth0 rules.
To create a rule in the Auth0 Portal navigate to Rules, click “Create Rule” and pick an empty rule from the templates.

Paste the code below and save the new rule named as “Add Group Claim”.
function (user, context, callback) {
    context.accessToken['https://sa.io/group'] = user.groups[0];
    return callback(null, user, context);
}
Note: This code picks the first group of the user as defined in the Authorization Extension and adds it to the access token as a custom namespaced claim.
Go back to the Rules page and verify that you got two roles in this order:
- auth0-authorization-extension
- Add Group Claim
The order matters because the groups field is retrieved asynchronously by the auth0-authorization-extension rule and then it is added as a namespaced claim by the second rule, resulting in the following access token:
{
  "https://sa.io/group": "Moderators",
  "iss": "https://bookinfo.eu.auth0.com/",
  "sub": "google-oauth2|196405271625531691872"
// [shortened for brevity]
}
Now we must configure the Envoy proxies to verify user access by extracting the group from the claim https://sa.io/group in the returned access token. That is the topic of the next section, let’s move over there.
Configuring Authorization in Istio
For Authorization to kick in we need to Enable RBAC for Istio. To do so apply to the Mesh the following configuration:
- Enables RBAC only for the services and or namespaces specified in the Inclusion field.
- Include the list of services specified.
Apply the configuration by executing the command below:
$ kubectl apply -f resource-manifests\istio\security\enable-rbac.yaml
rbacconfig.rbac.istio.io "default" created
Now all services require Role-Based Access Control, in other words access to all services is denied and will result in the response “RBAC: access denied”. Enabling access to authorized users will be the topic of the next sections.
Configuring Regular User access
All users should be able to access the SA-Frontend and SA-WebApp services, this is achieved with these Istio’s resources:
- ServiceRole: specifies the permissions that a user has and
- ServiceRoleBinding: specifies to whom a ServiceRole applies.
For regular users we will allow access to the specified services:
And using the regular-user-binding we will apply the ServiceRole to all visitors of our page:
Oh! All users this means that unauthenticated users can SA WebApp? No, the policy will still check the validity of the JWT token. 😉
Apply the configurations:
$ kubectl apply -f resource-manifests/istio/security/user-role.yaml
servicerole.rbac.istio.io/regular-user created
servicerolebinding.rbac.istio.io/regular-user-binding created
Configuring Moderator User access
For our moderators we want to enable access to all the services:
But we want to bind it only to users whose Access Token has the claim https://sa.io/group equal to the value Moderators.
To apply the configurations, execute:
$ kubectl apply -f resource-manifests/istio/security/mod-role.yaml
servicerole.rbac.istio.io/mod-user unchanged
servicerolebinding.rbac.istio.io/mod-user-binding unchanged
Due to caching in the envoys it could take a couple of minutes for the Authorization rules to go in effect, but after that, you will be able to verify that Users and Moderators have different levels of access.
Seriously have you ever seen a simpler process, zero-effort scalable authentication and authorization concept? Neither have I. Let’s move on to the conclusion.
If you enjoyed the article, please share and comment below!