
- Istio an introduction
- Getting started with Istio
- Istio in Practice – Ingress Gateway
- Istio in Practice – Routing with VirtualService
- Istio out of the box: Kiali, Grafana & Jaeger
- A/B Testing – DestinationRules in Practice
- Shadowing – VirtualServices in Practice
- Canary Deployments with Istio
- Timeouts, Retries and CircuitBreakers with Istio
- Authentication in Istio
- Authorization in Istio
- Istio series Summary
To set up Istio you need a Kubernetes Cluster with at least 4 vCPU and 8 GB of RAM. This guide is tested with the following Kubernetes Implementations:
- Google Container Engine (GKE)
- Azure Kubernetes Service (AKS)
- Digital Ocean (20 days free Kubernetes link)
After creating the cluster and configuring access with the Kubernetes command line tool we are ready to install Istio using the Helm Package manager.
Installing Helm
Install the Helm client on your computer as explained in the official docs. Which we will use to generate the Istio installation templates in the next section.
Installing Istio
Download Istio’s resources from the latest release, extract the contents and add the directory [istio-resources]/bin to the PATH environment variable. Verify installation by executing the command:
$ istioctl version
To easily identify the Istio resources create a namespace istio-system in your Kubernetes Cluster:
$ kubectl create namespace istio-system
Complete the installation by navigating to [istio-resources] directory and executing the command below:
$ helm template install/kubernetes/helm/istio --name istio \
    --set global.mtls.enabled=false \
    --set tracing.enabled=true \
    --set kiali.enabled=true \
    --set grafana.enabled=true \
    --namespace istio-system > istio.yaml
The above command prints out the core components of Istio into the file istio.yaml. We customized the template using the following parameters:
- mtls.enabled is set to false to keep the introduction focused.
- enabled enables tracing of requests using jaeger.
- enabled installs Kiali in our claster for Visualizing Services and Traffic
- enabled installs Grafana to visualize the collected metrics.
Apply the generated resources by executing the command:
$ kubectl apply -f istio.yaml
This marks the completion of the Istio installation in our cluster! Wait until all pods in the istio-system namespace are in Running or Completed state by executing the command below:
$ kubectl get pods -n istio-system
Now you are ready to continue with the next section, where we will get the sample application up and running.
Sentiment Analysis Application Architecture
We will use the same microservice application used in the Kubernetes Introduction article, it is complex enough to showcase Istio’s features in practice.
The App is composed of four microservice:
- SA-Frontend service: Serves the frontend Reactjs application.
- SA-WebApp service: Handles requests for Sentiment Analysis.
- SA-Logic service: Performs sentiment analysis.
- SA-Feedback service: Receives feedbacks from the users about the accuracy of the analysis.
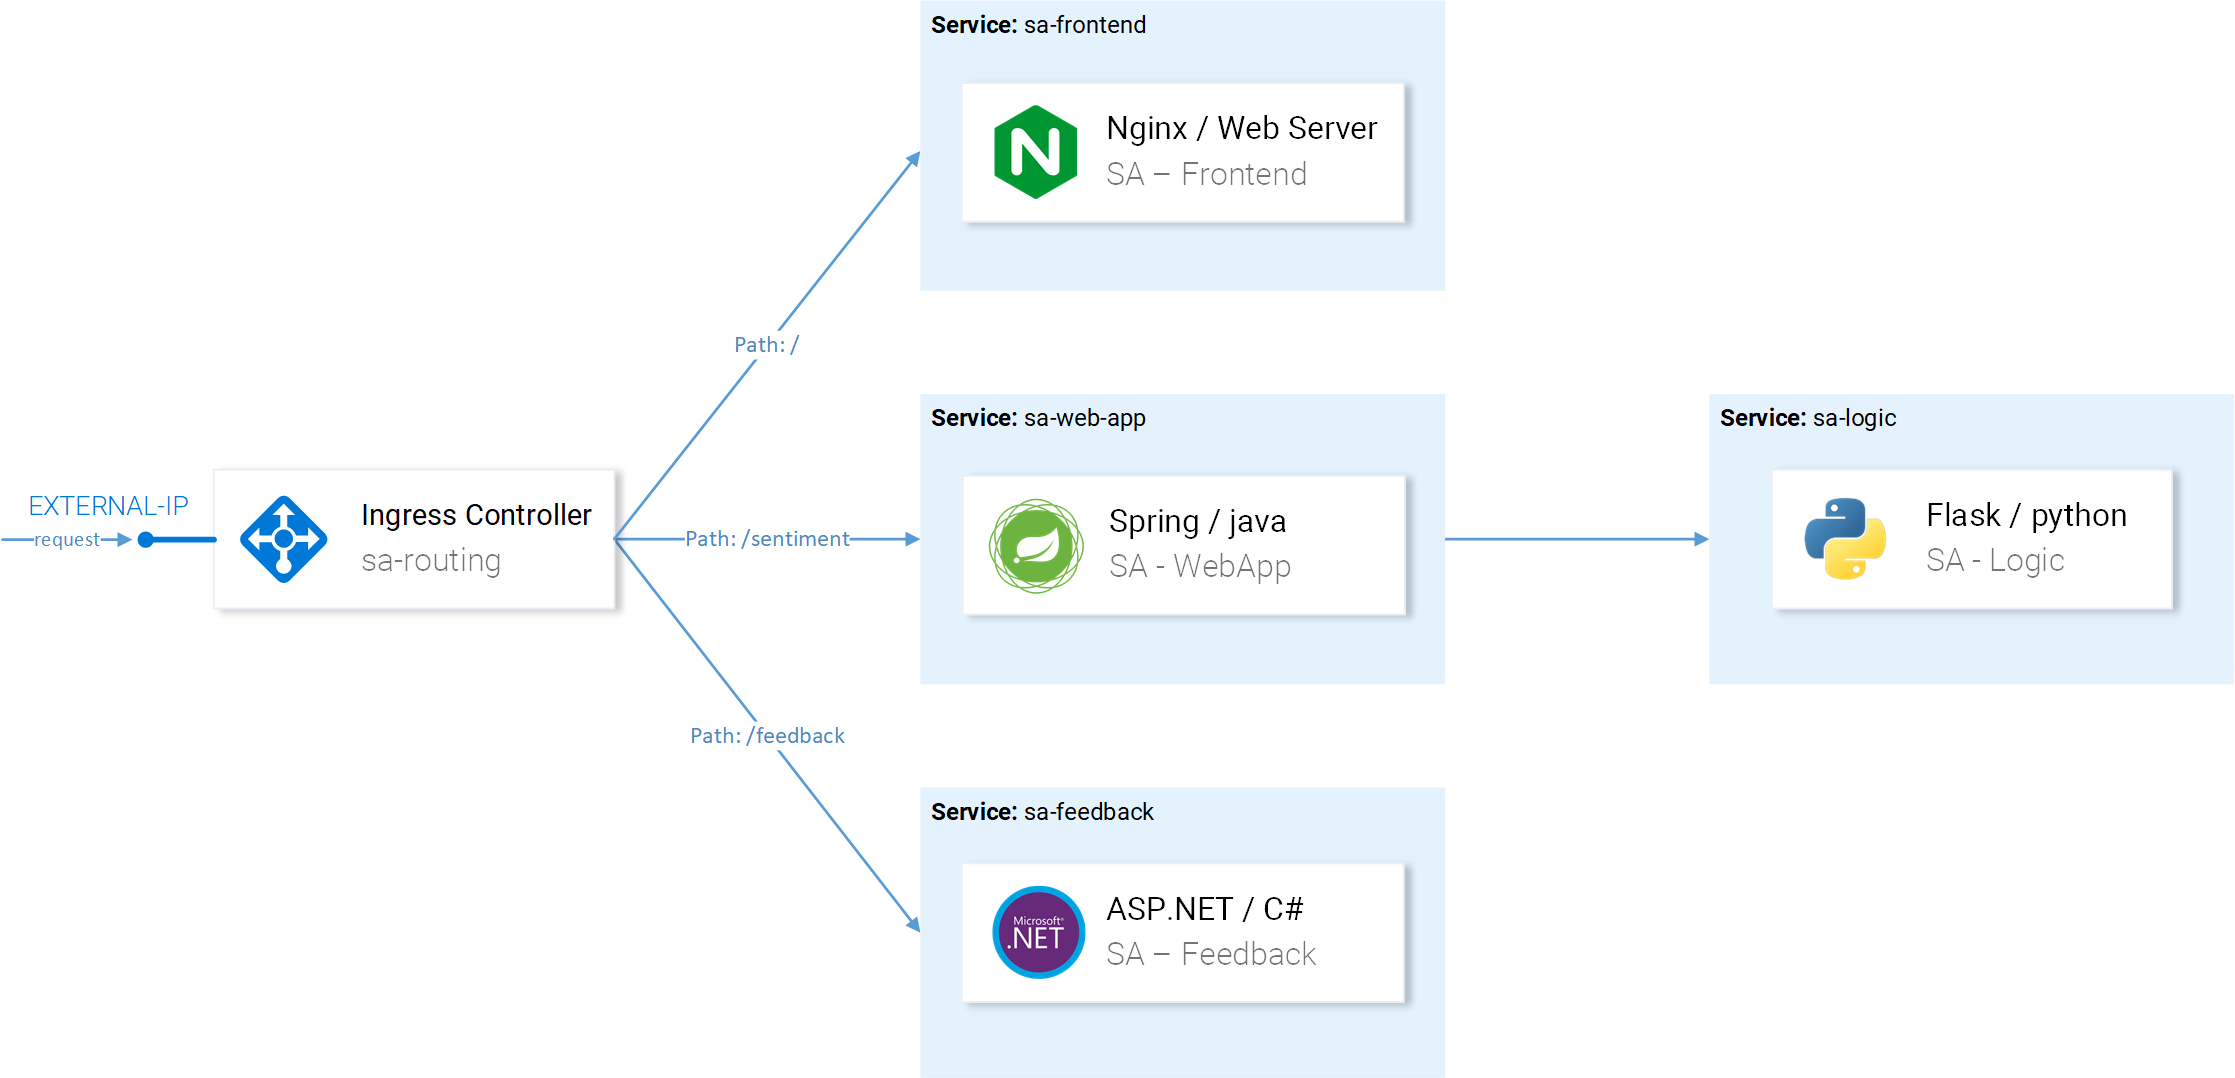
In Fig. 1 besides the services we see the Ingress Controller which in Kubernetes routes incoming requests to the appropriate services, Istio uses a similar concept called Ingress Gateway, which will be a subject in the next article.
Running the Application with Istio Proxies
To follow up with this article clone the repository istio-mastery, containing the application, the Kubernetes and Istio resources.
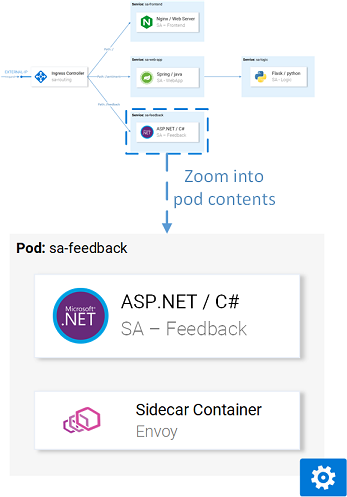
Sidecar Injection
As mentioned to intercept all network traffic Istio injects sidecar containers in every pod, this is done Automatically or Manually. To enable automatic Sidecar injection, we need to label the namespace with istio-injection=enabled, done by executing the command below:
$ kubectl label namespace default istio-injection=enabled
namespace/default labeled
From now every pod that is deployed into the default namespace will get the Sidecar automatically injected. Navigate to the root folder of the [istio-mastery] repository and execute the following command:
$ kubectl apply -f resource-manifests/kube
persistentvolumeclaim/sqlite-pvc created
deployment.extensions/sa-feedback created
service/sa-feedback created
deployment.extensions/sa-frontend created
service/sa-frontend created
deployment.extensions/sa-logic created
service/sa-logic created
deployment.extensions/sa-web-app created
service/sa-web-app created
Execute the command and verify that under the Ready column we see “2/2” indicating that a second container is injected.
$ kubectl get pods
NAME                           READY     STATUS    RESTARTS   AGE
sa-feedback-55f5dc4d9c-c9wfv   2/2       Running   0          12m
sa-frontend-558f8986-hhkj9     2/2       Running   0          12m
sa-logic-568498cb4d-s9ngt      2/2       Running   0          12m
sa-web-app-599cf47c7c-s7cvd    2/2       Running   0          12m
Closing down into one of the containers we will see the result as shown in Fig. 5. where every pod has a sidecar container that will manage inbound and outbound traffic.
The application is up and running but to access it we need to allow incoming traffic, for which we use the term ingress traffic, and will be the main topic of the next article.
If you enjoyed the article, please share and comment below!