
- Istio an introduction
- Getting started with Istio
- Istio in Practice – Ingress Gateway
- Istio in Practice – Routing with VirtualService
- Istio out of the box: Kiali, Grafana & Jaeger
- A/B Testing – DestinationRules in Practice
- Shadowing – VirtualServices in Practice
- Canary Deployments with Istio
- Timeouts, Retries and CircuitBreakers with Istio
- Authentication in Istio
- Authorization in Istio
- Istio series Summary
Intro to Ingress Gateway
A best practice for allowing traffic into your cluster is through Istio’s Ingress Gateway which positions itself at the edge of the cluster and on incoming traffic enables Istio’s features like routing, security, monitoring.
During Istio’s installation, the Ingress Gateway component and a service that exposes it externally were installed into the cluster, to get its External IP execute the command below:
$ kubectl get svc -n istio-system -l istio=ingressgateway
NAME                   TYPE           CLUSTER-IP     EXTERNAL-IP    PORT(S)
istio-ingressgateway   LoadBalancer   10.0.132.127   13.93.30.120   80:31380/TCP,443[...]
In the continuation of this article we will access the application on this IP (referred to as the EXTERNAL-IP), for convenience, save it in a variable by executing the command below:
$ EXTERNAL_IP=$(kubectl get svc -n istio-system \
-l app=istio-ingressgateway \
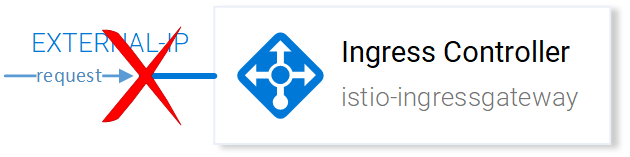
-o jsonpath='{.items[0].status.loadBalancer.ingress[0].ip}')Try to reach the IP in your browser and you will get a Service Unavailable error, as by default Istio doesn’t allow any incoming traffic until we define a Gateway.
The Gateway Resource
A Gateway is a Kubernetes CustomResourceDefinition defined upon Istio’s installation in our cluster that enables us to specify the Ports, Protocol and Hosts for which we want to allow incoming traffic.
In our scenario, we want to allow HTTP traffic on Port 80, for all hosts. Achieved with the following resource definition:
All the configuration is self-explanatory besides the selector istio: ingressgateway. Using this selector, we can specify to which Ingress Gateway to apply the configuration, and in our case, it is the default ingress gateway controller installed on Istio setup.
Apply the above configuration by executing the command below:
$ kubectl apply -f resource-manifests/istio/http-gateway.yaml
gateway.networking.istio.io "http-gateway" created
The gateway now allows access in port 80 but it has no concept where to route the requests.
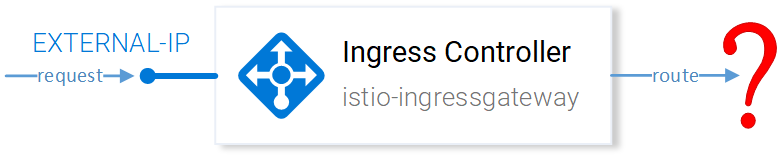
That is achieved using Virtual Services, which is the main topic of the next article, let’s get over there!
If you enjoyed the article, please share and comment below!